However, sometimes this tool does not work properly due to various possible reasons. The CHKDSK command usually gives an error message specifying the reason for such an issue. But there are also cases where the program fails to run automatically when it should. In this article, we mention different cases when CHKDSK doesn’t work, along with what you should do to resolve such issues.
Why is CHKDSK Not Working?
How to Fix CHKDSK Not Working?
First, make sure you have sufficient free space on your drive. Then, apply the possible solutions we have provided below to troubleshoot your issue.
RAW Partition.Fast startup enabled with multi-Windows OS system.Third-party interference.Not using proper flags to repair the drive.Disk failures.Write protection on the drive.
Different types of CHKDSK issues also give separate error messages. So, you might be able to go to the relevant solution directly depending on your error.
Run or Re-run CHKDSK Properly
The first thing you should do is run or re-run CHKDSK using proper syntax and flags. CHKDSK requires admin privileges to run. So make sure to run it on the Elevated Command Prompt. To open Elevated Command Prompt, You need to use specific flags to repair drive corruption using CHKDSK. If you don’t use these flags, it only displays that some files need to be fixed but doesn’t rectify them. The flags you need are:
/f – repair logical disk error/r – repair boot sectors/x – force the disk to unmount and run the program before booting the OS
If an active process is using the drive or CHKDSK can’t lock the disk, it will ask you if you want to schedule the checking process for the next time you boot your system. Type Y and press Enter to confirm if you want to repair the disk. Additionally, you can only use CHKDSK to repair local disks. It can’t fix any drives redirected over a network.
Run Fsutil Dirty Command
Sometimes, scheduling CHKDSK to repair the system drive (usually C:) on the next boot doesn’t work. In such cases, you need to use the fsutil command to set the system flag to run CHKDSK on reboot. Here’s how you can do so: This command sets the Volume’s dirty bit, which causes the program autochk.exe (another version of CHKDSK) to check the volume for corruption on the next reboot automatically.
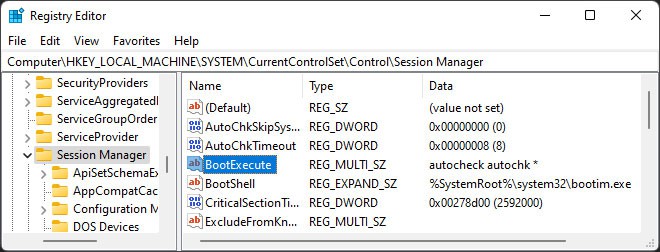
Check BootExecute Registry
The BootExecutre registry entry specifies whether your system runs autochk.exe if a Volume’s dirty bit is set. If there are any errors with this entry, your system may check your disk on every next boot, or autochk.exe may not run at all. Here’s how you can check this registry entry: If you want to disable autochk.exe from running in the next boot, enter the following commands:
chkntfs C: (It shows whether your system has scheduled a check scan on the C: drive)chkntfs /x C: (to cancel the schedule)
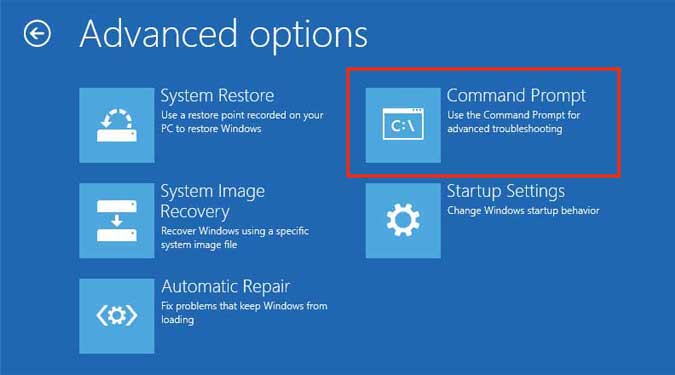
WinRE Command Prompt
If CHKDSK is not working properly if you run it from within your account, you can try running it from the Windows Recovery Environment. Doing so prevents all conflicts with other programs that may affect the process. You can also easily run CHKDSK on your boot drive.
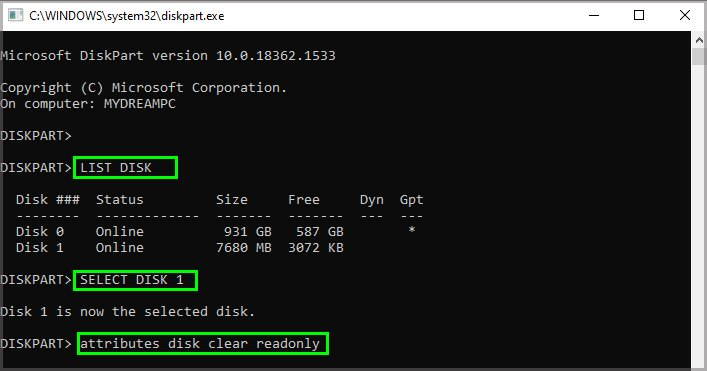
Disable Write Protection
You can’t run CHKDSK on a write-protected external drive. If you try to do so, you’ll get the message, “Windows cannot run disk checking on this volume because it is write protected.” So, check if there’s any write protection switch on the drive and make sure to disable it. It is also possible to set write protection on your disk from the DiskPart CLI. To disable it, Now, try running CHKDSK again.
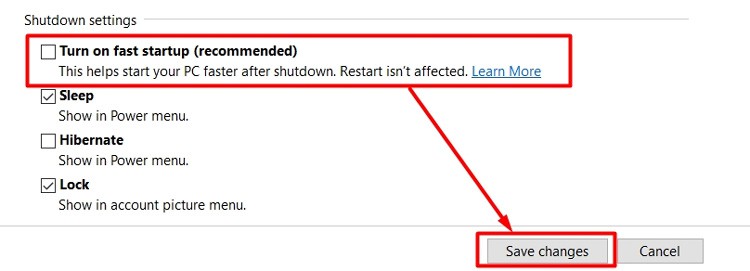
Disable Fast Startup
Fast Startup or Hybrid Sleep causes many issues with a multi-OS system. One example is CHKDSK running automatically when you switch from one Windows OS to a different Windows version. All your devices do not refresh properly as a fast startup is like hibernation, where your devices are in suspended states after the shutdown. So, one system might detect another as corrupt due to differences in file structure and force a CHKDSK scan. You need to disable fast startup to resolve this issue. To do so,
Update Windows OS
Some Windows updates may introduce bugs that cause CHKDSK errors. In such scenarios, report the bugs to Microsoft and wait for bug fixes. If you have disabled automatic update downloads, make sure to install all the latest updates on your system. Also, Windows 8 and Server 2012 users might encounter an issue with CHKDSK on an external exFAT format drive with more than 2 TB size. Here, CHKDSK reports file system corruption even when there’s no problem with the drive’s integrity. Moreover, running the repair process instead corrupts the drive. The KB2843376 Microsoft Update provides a patch for this issue, so install it in such a case.
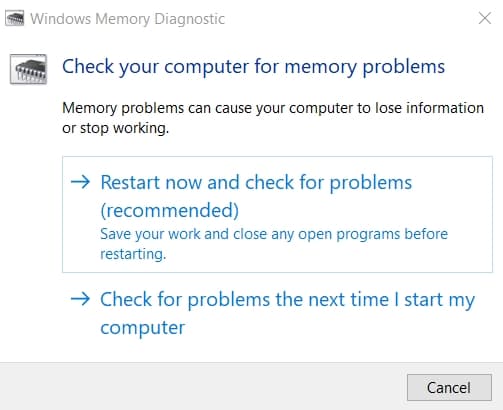
Run Memory Diagnostic
Several system issues result due to problems with your memory. Running all programs, including CHKDSK, needs RAM. And running CHKDSK with faulty memory can also corrupt your disks or drives. In order to run memory diagnostic tool,
Press Windows + r open the run dialogue prompt and enter MdSched.exeOn the new prompt of diagnostic tool, select Restart now and check for problems.Let the computer restart and complete checking for any errors in memory modules.
We have prepared a detailed article on Windows Memory Diagnostic for your better understanding of the tool and its mechanism. We are confident that you’ll like it. Do leave us with your valuable feedback.
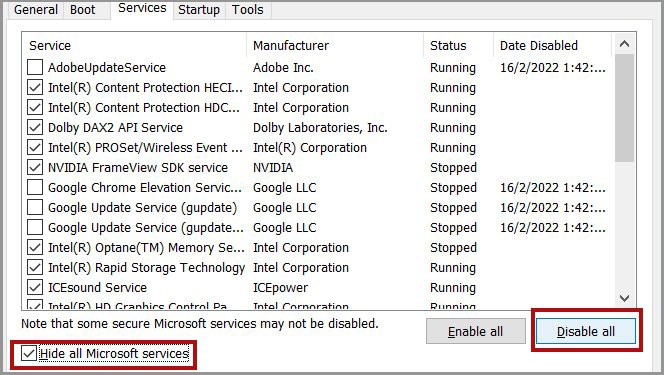
Troubleshoot in Clean Boot
It is also possible that some third-party application is locking our partitions. In such a scenario, running CHKDSK gives you the “Cannot open volume for direct access” error message. So first, boot in safe mode and check if CHKDSK starts working. If it doesn’t, you need to boot in clean mode to determine the conflicting software. Here are the necessary steps: Now, restart your PC, enable each service or startup app, reboot again, and check if the issue persists. Do so for all services and apps to determine the conflicting app. Then you can disable or uninstall the app.
Format RAW Drive
If you try to run CHKDSK on a RAW drive, you’ll get the error message: “CHKDSK is not available for RAW drives.” You need to format the drive to set a valid file system. Formatting the drive erases all its contents. So make sure to recover the necessary data using recovery software. Then, open the Elevated Command Prompt and enter the command format H: /fs:fat32. Here, don’t forget the replace H: with the RAW drive letter and fat32 with the file system you want. For 64 GB+ disk, you can’t format it to FAT32 system. If this command fails to format the drive, you need to use the DiskPart.
Use Other Disk Diagnostic Software
CHKDSK can only fix limited sector errors on a drive. It can either directly repair the logical bad sectors or mark the physical sector’s errors so that your system doesn’t use them anymore. However, if there are too many bad sectors due to physical damage or other reasons, your drive starts failing, and CHKDSK can’t fix them. So, you should use disk diagnostic software to check the drive’s health. Most hard drives come with their own diagnostic software, such as:
WD Hard drivesSeagate Hard drives
But you can also use third-party software programs, like HDDScan, DiskCheckup, and so on. If your drive is failing, you’ll likely need to replace it.