Although the error message instructs you to restart the installation to move forward, doing so rarely works. This is because the likely culprit for a failed installation is probably your corrupted disk drive. So, if restarting the setup process doesn’t work, you have to resort to some other technical fixes. Luckily, that’s exactly what we are here for. In this guide, we shall learn about all the methods you can use to fix this issue and continue your installation to completion.
Why Is Windows Unable to Boot Computer Into Next Phase of Installation?
How to Fix This Installation Error?
Now that we’ve briefly understood the causes that lead to this error, we can move on to its fixes. This guide covers all the working methods, that include steps ranging from a simple verification check to more technical fixes. By the end of this guide, we are pretty sure that your installation will be completed successfully.
Ensure the BIOS Supports Your Windows Version
Firstly, make sure that your motherboard BIOS supports the Windows version you plan to install. If you’re deciding to upgrade to Windows 11, the Legacy BIOS mode is not supported. And somehow, if you have already installed Windows 11 with the Legacy BIOS, you cannot further update your OS anymore. So, it’s advisable to first ensure that the BIOS and your OS are compatible with each other. Surf the web and visit your manufacturer’s website to determine if they work together or not.
Ensure That the Windows Installation Media Is Configured Properly
A pretty common reason that affects the installation process is improperly configured installation media. A bad Windows setup file directly lead to various installation problems, including the one you’re facing as well. So, if you’re unsure about the credibility of your media file, you can simply recreate it with the right steps. You can use either Rufus or the Media Creation Tool to create a bootable USB. Luckily, we do have a dedicated guide that aims to guide you with a step-to-step process on how you can create a Windows installation media the right way. Note that if you plan to use a bootable USB drive, do so via the USB 2.0 port on your computer. However, if the issue still persists, follow all the steps listed below until one of them fixes your problem.
Disconnect the Non-Essential Peripherals
It’s important to disconnect any non-essential peripherals that might be connected to your device during the installation process. Either because of a bug or glitch, some BIOS versions have been known to act in an unwanted manner when too many unnecessary devices are connected during the installation process. Disconnecting non-essential peripherals such as your headphones, speakers, USBs, and maybe even your extra hard disks can prevent any conflicts that might occur during setup. If you have not done so, remove unnecessary devices, restart your computer and try installing the OS once again.
Update BIOS
An outdated BIOS is known to give rise to certain compatibility issues between the operating system and the hardware devices. Also, there might currently be various security requirements that can only be resolved by updating the BIOS. So, updating BIOS can also fix the bugs present in the previous build and incorporate new patches to make the system function better. Hence, before you begin the installation process, visit your motherboard manufacturer’s website and download the BIOS file compatible with your system. We also have a guide dedicated to how you can update your BIOS safely. Keep in mind that the BIOS resets back to default after a fresh update. So, you will need to reconfigure all your custom settings once this is done.
Run CHKDSK
The Check Disk (CHKDSK) tool in Windows OS helps you determine hard disk errors and also tries to troubleshoot them. The main goal of CHKDSK is to ensure that your computer’s disk drives are healthy and functional. It also checks for any file corruption due to bad sectors on the hard drive and aims to repair them as well. The CHKDSK can be run using a couple of different methods, but here, we will be doing so via the Windows Recovery Environment. For this,
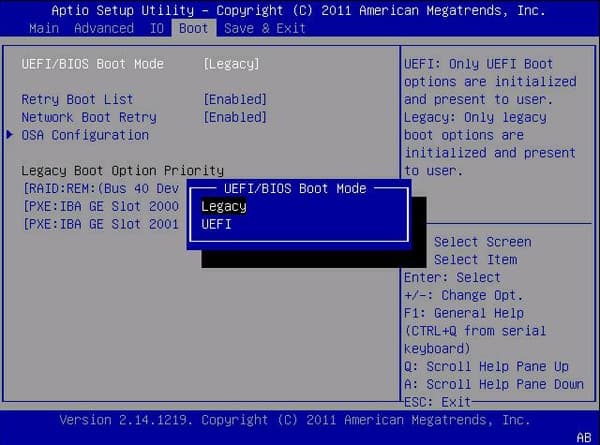
Enable UEFI on BIOS
Although the UEFI firmware has been around for almost a decade, this step is a must if you’re planning to upgrade your OS to Windows 11. Also, if Windows 11 was previously installed on your computer in the Legacy BIOS mode, it’s necessary to change to UEFI. This will allow your system to update your operating system and also continue your failed installation. The UEFI has plenty of advantages over the older Legacy BIOS and can hence be enabled with these steps:
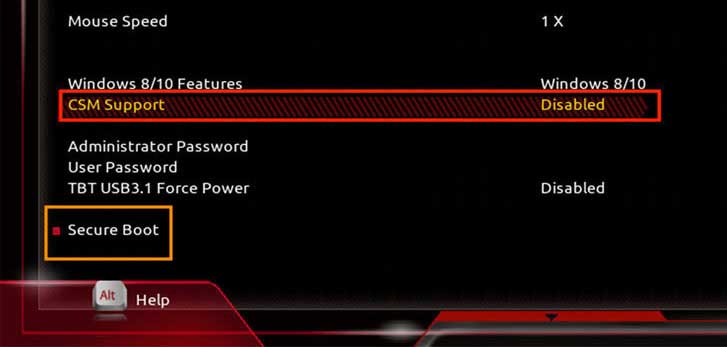
Disable CSM and Secure Boot
Although CSM and Secure Boot are useful additions to the UEFI firmware, we have dug up various forums to find out that they can be pretty troublesome during the installation process. The CSM feature allows the UEFI firmware to access certain features of the Legacy firmware. Whereas, the Secure Boot ensures that your computer only boots up using the Original Equipment Manufacturer’s software. So, for now, disable CSM and Secure Boot, and then try to continue the installation. Once the installation process is complete, you can then re-enable these features at a later date. The steps to disable CSM and Secure boot are as follows:
Re-Configure Partition
If unfortunately, your OS setup is getting stalled due to corrupted system files, you have to delete the particular volume on which Windows is installed. This will clear all the data within the volume, including the partition details. It’s also advisable to set the appropriate drive partition style before you begin the installation procedure. That is, if you’re using a UEFI BIOS, you have to set a GPT drive partition style. And, for legacy BIOS, you should set the MBR drive partition style. So, for this, Enter the setup window and continue the setup on c: drive. You’ll now notice that the installation shall proceed smoothly.