This setting is enabled by default and as such, most users wonder if disabling it causes any issues in their system. The short answer to this question is that USB Selective Suspend is a power saving feature and whether you can disable it depends on your scenario. In this article, we have explained this feature in detail to help you decide if you should turn it on or off by yourself.
What is USB Selective Suspend?
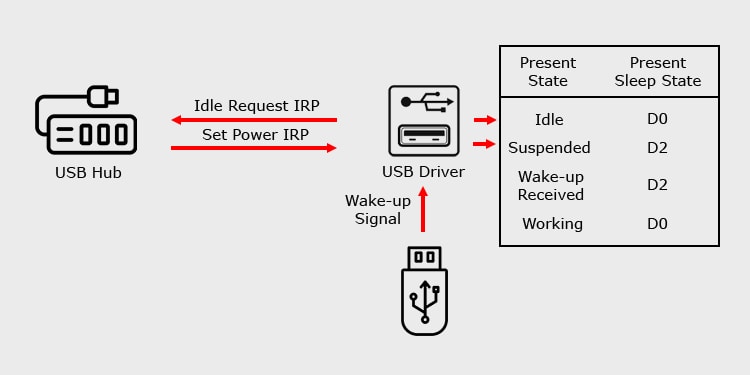
USB selective suspend is a Windows feature that allows the USB hub driver to suspend a single USB port without affecting other ports. This is a power-saving feature that suspends the port when it has been idle for some time. However, you shouldn’t confuse suspend with disable. The driver doesn’t cut off all power from the ports but powers it down to a low power state. The suspended USB can respond to the external wake signal if its remote wake-up capacity is enabled. The USB devices produce the wake signals when you insert it to the port. One thing you should know is that all devices don’t produce wake up signals. Mice, keyboards, modems, external USB hubs, etc., have wake-up capability. However, some devices such as mass storage devices, audio and video device, and so on don’t have such capacity. To understand the full process for USB Selective Suspend, let’s take a look at the USB power/sleep states and the mechanism behind it.
USB Power States
There are many models of USB power states. However, if we want to discuss the selective suspend, we use the Windows Driver Model (WDM), which has D0 to D3 power states. The D-state is different from S-state (system’s power level) and C-state (processor’s power level). So, they can have different values. However, a higher D-state can prevent other states from going to a lower level. D0 In this power state, all USB ports on the computer have full power and receive requests as soon as you connect a device. So, lowering the power state from D1 to D0 disables the suspension of the ports. Since there’s no need to remotely wake up the port, the driver also disables the remote wake up feature. D1/D2 In this power state, the bus driver suspends the USB ports. However, it enables the remote wake feature, allowing the port to respond to external wake signals. D3 It is the deepest USB sleep state. The driver suspends the USB port and also doesn’t allow remote wake ups in this state. USB selective suspend only lowers the power state to D2 and not D3.
Mechanism for USB Selective Suspend
Windows supports multiple ways to suspend the power of a USB device depending on whether it is a composite or a single interface device. However, the traditional method is by using idle request IRP (I/O Request Packet). If you connect a device that is not capable of producing remote wake up signal, it needs to rely on the the set power IRP request to change the port’s power state. This is why there’s a period of inactivity after connecting the devices and before you can use them. In some scenarios, the request to change the USB power state can fail, which leads to USB device not recognized error or even BSOD crashes.
Pros and Cons of USB Selective Suspend
USB Selective Suspend is very useful in saving power for laptops and other portable devices that run on battery. Enabling this setting also helps you prolong the lifespan of the battery. Many devices, such as fingerprint and biometric scanners don’t require continuous power. So, it’s better to use Selective Suspend if you use such devices. However, desktop PCs won’t get any use out of this feature as they don’t need to save power. The Selective Suspend is also not appropriate for important peripherals such as keyboard or mouse. Moreover, as we mentioned earlier, your system may fail to recognize your USB device when this feature is On. This issue is especially prominent in the following scenarios:
Multiple peripherals are connected to your PC.Running resource-intensive tasks, such as games.
How to Enable/Disable USB Selective Suspend?
There are a few ways to enable/disable USB selective suspend on Windows. The easiest methods for changing this setting for all hubs involve using the Control Panel and the Command Prompt. However, you can also use the Device Manager to enable/disable selective suspend for particular USB hubs.
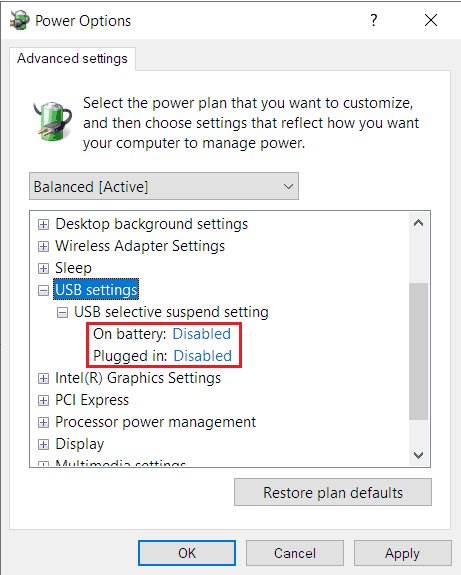
Using Control Panel Power Options
Using the Control Panel is the most convenient way to change your power settings, including USB Selective Suspend. Here’s the complete process:
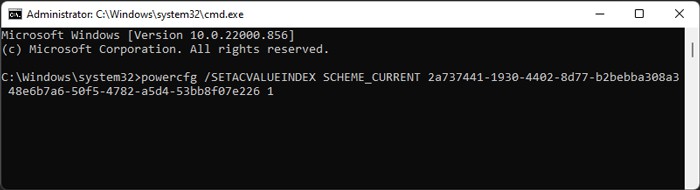
With Command Prompt
Another method to change the USB selective suspend configuration is by using a CLI command. The commands for power options are difficult to remember, but if you copy and paste the command, this method is the quickest. To set the setting for AC or plugged in mode for the current power plan: Use the same commands while replacing SETACVALUEINDEX with SETDCVALUEINDEX for changing the setting for on battery mode.
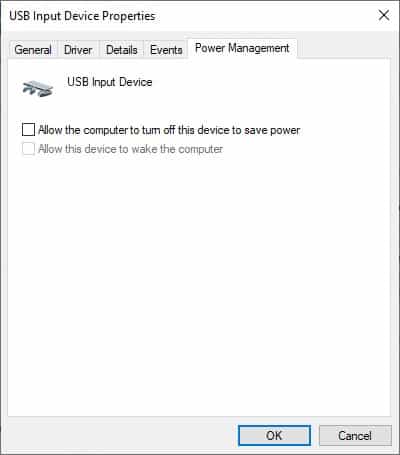
Through Device Manager
You can set a similar power management option for the USB hubs using the Device Manager. Enabling this option makes your system turn off the hub on idle state to save power. To enable this option,
Should You Turn USB Selective Suspend On or Off?
In conclusion, if you use a laptop or any other portable Windows system, you should enable this setting. However, if you start experiencing issues with your USB, such as “device not recognized” errors or BSODs while connecting USB devices, it’s better to turn it off. For desktop users, this setting has no practical usage and it’s always best to disable it.