It can happen due to conflicts with the drivers or other software, especially after the transition to Windows 11. But be assured that it is only because Windows 11 is a fairly new OS. Developers will undoubtedly fix such issues in the future updates. There may also be other possible reasons for the issue on your system. But don’t worry too much. It’s very easy to narrow down the reason. And in most cases, some simple solutions are enough to fix the issue. At worst, you only need to reinstall Windows 11 or replace a hardware component. So, without any delay, let’s get right into the potential causes and their corresponding solutions.
Why is My Windows 11 Always Crashing?
How to Fix Windows 11 Crashes
First, you’ll get a message or stop code for the error if it’s a BSOD crash. Some examples include CRITICAL_PROCESS_DIED, PFN_LIST_CORRUPT, and so on. You can search the message on the internet for the most relevant fixes. In other cases, you’ll probably need to apply all possible solutions.
Lack of RAM or Hard Disk space.Overheating of CPU.Overclocking CPU or GPU.Faulty RAM, Hard Disk or GPU.Incompatible or buggy drivers.System file or boot sector corruption.Interference due to third-party programs.
And if you get stuck in a crash loop while booting, try booting in safe mode and apply the methods below.
Check Your System Specifications
Many modern applications require high-spec hardware components. If your CPU, GPU, or RAM is lacking, using resource-intensive apps will crash your PC. You can enter msinfo32 on Run to check your system specifications. Then, check the minimum resources necessary for running such apps. You need to extend your RAM or add GPU if your system doesn’t support the necessary apps. Adding hard disks for more storage and virtual memory space is also a good idea. The virtual memory compensates for the lack of available RAM. Additionally, some external hardware may not be compatible with your system. So, try removing all peripherals to check if they are causing this issue. You can then update the drivers or replace the devices. But don’t forget to check the manufacturer’s website for any issues.
Check Power Adapter
If you have multiple power adapters, you may use the wrong charger for your laptop. It will charge your PC. But your system will crash if its output doesn’t match the PC’s voltage requirements. We recommend always using the original charger for your laptop. If you have to use an alternative, ensure that it provides the exact input your laptop needs.
Perform Startup Repair
Sometimes. the system keeps on crashing while booting. It’s better to perform a startup repair before trying other methods in safe mode in such cases. You need to access Windows Recovery Environment (WinRE) to use this method. There are a few ways to go to WinRE, such as:
Press the keyboard shortcut before the startup screen loads. The key varies between systems, so check out the manufacturer’s website.Force shutdown your PC at the startup screen three times in a row. Press and hold the power button for a few seconds for a force shutdown. On the third boot, click on Advanced options in the Repair screen. Boot your PC with a Windows Installation media and select Repair on the Install screen.
Then, go to Troubleshoot > Advanced options > Startup Repair to execute the process. If Startup Repair doesn’t fix the issue, rebuild your BCD and try again.
Use Advanced Tools to Narrow Down the Cause
There are many possible kinds of system crashes with different causes for Windows 11. Before trying out the possible solutions, narrowing down the cause would be wiser. After determining the culprit, move on to the relevant sections to resolve your issue. You can use the following tools to do so:
Windows Memory Diagnostic
Windows Memory Diagnostic is the tool to check the status of your RAM. Faulty RAM is one of the most common causes of crashes. Also, try cleaning your RAM sticks and slots before deciding you need a replacement. We have a dedicated article on How to Open and Use Windows Memory Diagnostic. Check it out to run this program and troubleshoot defective RAM.
Event Viewer
The Event Viewer records logs for all system processes. If you check the logs for the crash, you can likely find the responsible component. Here are the necessary steps: Make sure to check all the events that occurred at that time.
Crash Dump Debugger
If the option to create crash dumps is on, a crash should create a memory dump at C:\Windows or C:\Windows\Minidump. You can analyze the dumps using a debugger such as WinDbg Preview. We also recommend running the driver verifier to check for driver faults. It stresses your drivers and forces the problematic ones to fail. Your system crashes as a result. Then you can analyze the crash dump file to determine the defective driver.
Update or Reinstall Drivers
Faulty drivers are some of the main reasons for system crashes. Especially after Windows 11 upgrade, many previous drivers conflict with the new OS. So, you need to update all your drivers. To do so, If you have the latest versions of the drivers, try reinstalling them. We actually recommend you install the latest drivers from the official website. It is also the best way to update your motherboard drivers. Also, old drivers for devices you no longer use may conflict with your current devices. So we recommend uninstalling them. The Device Manager hides them by default. So, click on View > Show hidden devices to make them visible.
Check Hard Disk
If your system crashes are more random in nature, it’s likely due to bad sectors. You can fix soft bad sectors (incorrect information in the sector) by using the CHKDSK utility. We also recommend using Hard Disk health monitoring tools to check for its health. If there are any issues, try a clean install of Windows 11 after reorganizing your partitions. If your system still crashes, your hard disk may have severe defects. So, take your device to a hardware expert for repair or replacement.
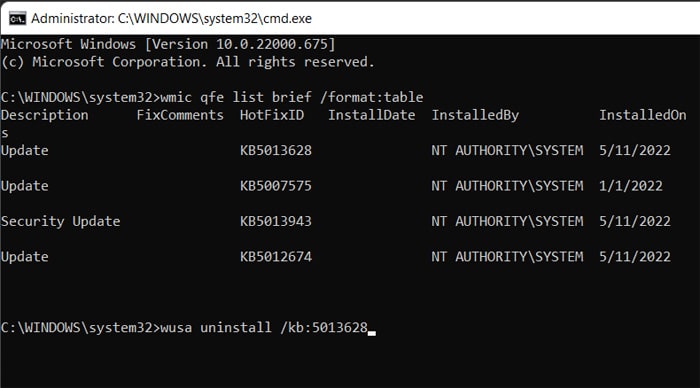
Update or Rollback OS
Some system updates may introduce new bugs to your system. Microsoft will provide the corresponding bug fixes in the later updates. So make sure to report such errors. After the further updates are available, install them as soon as possible. In the meantime, you can roll back your system to the stable version. To do so, You can also roll back to Windows 10 within ten days of the upgrade.
Perform Clean Boot
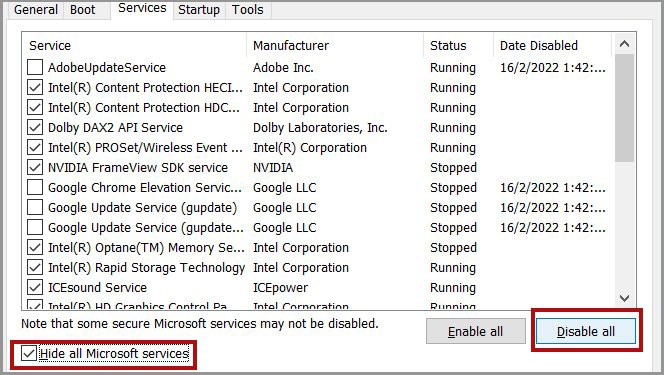
Incompatible third-party programs cause many system issues. Your system crashing when it can’t handle conflicting requests is one such issue. You can perform a Clean Boot and check for the responsible applications or services. However, remember that this method takes a lot of time to perform unless the crash occurs soon after a boot. Regardless, follow these directions to perform a clean boot: Then restart your PC. Now, enable individual application and service and operate your system normally. If you experience a crash, the enabled process is causing the compatibility issue. You can disable or uninstall the program or service to resolve it.
Repair Corrupt System Files
Corrupt system files or drive sectors prevents your system from loading important processes. It causes system crashes as a consequent. You can use Windows diagnostic tools such as SFC and DISM to repair your file system’s integrity. Follow the instructions below to run these programs: If they detect any errors, run the following commands for the respective tools:dism /online /cleanup-image /restorehealthsfc /scannow We also have a detailed article on How to Repair Corrupted Windows Files. Check it out if you encounter any issues while running SFC and DISM.
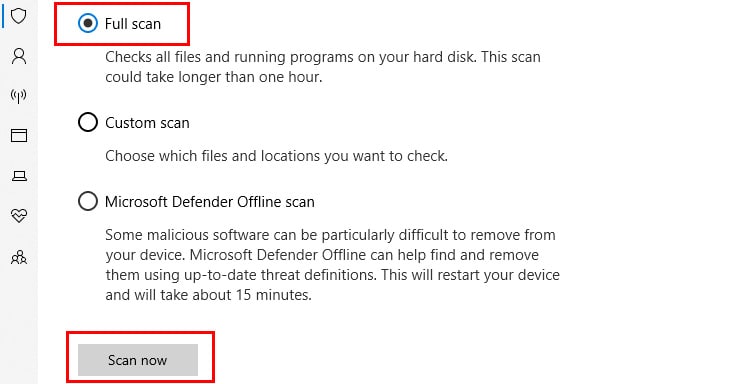
Scan for Malware
Many malware scripts also infect system files. Such programs can abruptly stop crucial system processes and cause crashes. You need to perform a full scan to resolve such issues. To do so using the Windows Defender: If you are in a startup crash loop, use the Command Prompt from WinRE to perform a full scan. To do so:
Troubleshoot Overheating
One of the main reasons for the system crashes is overheating the CPU or the GPU. In such cases, shut down your PC until it’s cooled down. Also, unplug all peripherals and power supply/battery while doing so. If your PC continues to overheat, you should clean all the dust from your computer. You can also take it for servicing at a repair shop. We recommend adopting safety practices to prevent your PC from overheating as well.
Disable Overclocking
Improper overclocking stresses your system or GPU beyond its handling capacity. So it is liable to cause system crashes. If you use any Overclocking software, disable the overclocking settings with the software. If you changed your BIOS settings for this purpose, the best solution is to reset your BIOS to default. The method to do so differs between separate devices. So visit their official website for the necessary steps. You can also remove and reinsert your PC’s CMOS battery to reset your BIOS settings. Or replace it with a new one if your CMOS is dead.
Restore or Reset System
You need to restore or reset your system if all previous methods prove ineffective. If you have an appropriate restore point, restore your system using the steps below: Otherwise, you need to reset your PC to the factory settings or clean-install Windows 11.
Related Questions
How to Apply These Solutions if I Can’t Log in to My Account?
If you can’t log in to your account, try booting in safe mode. Or you can access the WinRE Command Prompt as well. You can apply most of the methods using a CLI. Create a Windows installation or recovery drive if you can’t access WinRE normally. Then, boot using the drive and access its WinRE.
Where is the Option to Enable Dump File?
As we stated earlier, you can analyze the dump file as long as you haven’t disabled the option to create them. If you have done so and need to enable it again, follow the instructions below: